
Typography & Custom Fonts #
Typography settings in Rakmyat Themes control the fonts used in two places:
- Theme Options → Typography (for all pages that use the theme layout)
- Elementor → Site Settings → Typography (for pages built with Elementor).
1. Typography in Rakmyat Theme Options #
Use this for blog, archives, WooCommerce pages, and any page that is not fully designed with Elementor.
- Log in to WordPress admin.
- Go to: Rakmyat Dashboard → Theme Options → Typography.
- Configure the following:
- Primary Font Family
Main font used across the website for body text and most elements. Choose a Google Font from the list and, if needed, a backup system font (for example Arial, Helvetica, sans-serif). - Secondary Font Family
Optional font used for accents, special elements, or secondary text (for example subtitles or meta info). - Third Font Family (if available)
Extra option if you want a different font for certain sections such as headings or special blocks. - Heading Font Settings
Global setting for all headings (H1–H6). Here you can choose:- Font family for headings
- Font weight (for example Bold 700)
- Text transform, letter spacing, etc.
- Individual Heading Levels (H1–H6)
For each heading level you can fine‑tune:- Font size
- Line height
- Optional different font or weight.
- Scroll down and click Save Changes.
These settings apply to:
- Blog archive and single blog posts.
- Default pages (about, contact, etc.) that use the theme template.
- WooCommerce pages that use standard theme layouts.
Pages built entirely with Elementor are controlled separately from Elementor Site Settings

2. Typography in Elementor Site Settings #
Use this for pages created with Elementor (landing pages, custom home pages, etc.).
- Edit any Elementor page.
- Click the top‑left Elementor icon → Site Settings.
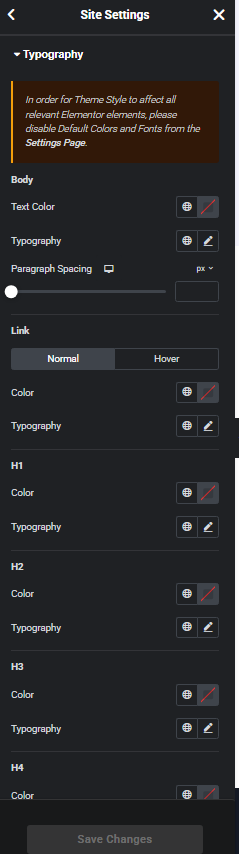
- Click Typography.
You will see groups for:
- Body
- Text Color
- Typography (font family, size, line height, weight)
- Paragraph spacing.
- Link
- Normal: color and typography for regular links.
- Hover: color and typography when mouse is over the link.
- Headings H1–H6
For each heading level you can set color and full typography options.
To make Elementor respect your global theme style, follow the note at the top:
In order for Theme Style to affect all relevant Elementor elements, disable Default Colors and Fonts from the Settings Page.
Do that once in: Elementor → Settings → General → uncheck “Disable Default Colors” and “Disable Default Fonts”, then Save.
After adjusting typography in Site Settings, click Save Changes at the bottom. All Elementor widgets that use default/global typography will now follow these values
3. How both systems work together #
- Rakmyat Theme Options → Typography controls the base fonts for theme templates (blog, archives, default pages, WooCommerce).
- Elementor → Site Settings → Typography controls fonts inside Elementor layouts.
For a consistent design across the whole site:
- Decide your brand fonts (for example: Primary = Poppins, Headings = Inter).
- Set the same families in both:
- Theme Options → Typography.
- Elementor → Site Settings → Typography (Body and Headings).
- Save in both places and clear cache if necessary.
Now typography will be unified for both theme‑based pages and Elementor‑built pages.


